Saturday, December 28, 2013

Front section of floor cut out!

Got the front section of floor cut out on Friday.  It needs to be sealed and dried before it can go in, but we also need to address the pop rivets on the exterior, the windows and front eyebrow before installing it for good.  I'm afraid of water damage until those problems are addressed.  No need to put in a new floor to leave it susceptible to rain, right??  Until then, I'll just be happy with the fact that we've made this accomplishment milestone.  2014 should be a continuation of progress! :)
My dad makes the cut on the second section of floor

First placement of front section of subfloor

Monday, December 23, 2013

Floor templates made, another window busted....

We had another couple of warm days blow in...literally.  The wind shattered one of my side windows.  This leads to one thing:  time to fix these window cranks.  I've put it off long enough.  I just ordered replacements from Vintage Trailer Supply less than an hour ago.  It will probably take it a little time to get here with the holidays and all, so we went ahead and taped all the windows down with aluminum tape.  I've had enough mishaps of my own making without needing mother nature's assistance, thank you very much!
On the other hand, we did get templates cut out for the front and rear floor.  My dad will hopefully saw the subfloor pieces tomorrow, and I plan to seal them with water sealant while I'm visiting him on Christmas day.
Speaking of Christmas, I wish all of you a wonderful holiday!!!  May your days be merry & bright!  Thanks for following along in our adventures :)

Monday, December 9, 2013

Dear ol' Dad helps in a major way

As noted by my prior posts, we've had some crazy weather here in NC over the last few days.  I was in a time crunch to try to clean, prep and paint the frame before some really cold weather settled in.  Last Thursday was 68 degrees, and Friday was forecast to be above 70.  My time frame looked something like this:  Mark was going to paint the frame around noon on Thursday, and I was going to put on the second coat when I got off work that afternoon.  Well, Thursday was not only rainy, it was extremely humid and the frame was sweating profusely.  There was no way we could paint it.  I was pretty sad because I figured Friday would be the same way.  But Friday was pretty blustery, therefore keeping the frame dry.  My dad was able to put on both coats Friday afternoon and I am soooo thankful for his help!  This means that the next step is putting the floor & insulation in those sections of the trailer.  Onward and upward!
Front end

Rear of trailer--looks pretty good!

Tuesday, December 3, 2013

Then the sparks flew!

Okay, so over the past couple of days, Derek has graciously worked on our welding/frame issues.  The weather this week is supposed to be above average temps, so I washed the frame tonight with the Marine Clean recommended by the POR folks.  Tomorrow, I will use the Metal Prep, and then Thursday I plan to get the painting underway.  I want to take advantage of these slightly warmer temperatures as much as possible...you just never know what the next week will bring.  I needed to do everything possible to hopefully get the front and rear floor in soon.
Derek is grinding away some small burrs, getting ready to do the heavy-duty welding.  How do ya like that face mask??!

Monday, November 25, 2013

Baby, it's cold outside

Temps in the teens/twenties at night, highs only in the 30s during the day.  That is the forecast for this week.  I still need to wash & prep the frame before applying the POR 15, but that can only be applied in temps above 52 degrees.  Not only am I waiting on warmer temps, but I'm waiting on my brother-in-law to have a chance to do the welding that needs to be done before I can paint the frame.  Until further notice ladies & gents, we are on hold with any progress.

The good news is that I *did* get new glass put in the two windows that we broke so THAT'S a bit of progress, right??  The one window where we bent the frame? Well the guy at the glass place worked for two hours to get it straightened out to be able to hold the glass, so I'm thankful for his hard work & efforts.  I won't get a chance to put it in the trailer until later this week, so that will be the true test.  Until then, I ordered some buck rivets to replace those outside pop rivets (a BIG no no) and a new window crank to see if they'll work better than the old ones that are defunct.  I just ordered one in case they don't work properly.  If they get the job done, then I'll be ordering more.

I'll be heading back over to the wig wam on Thursday--until then, I hope you all have a blessed Thanksgiving!!!!!

Wednesday, November 20, 2013

Recent decor purchases

Wonder how long away it will be before I can actually decorate the Airstream??  Who knows the real answer, but I continue to collect things from time to time, nonetheless.  Here are a couple of my recent Etsy purchases.  (For those of you following along that want to add to your vintage camper collection, there is a *ton* of available adorable items on Etsy--don't say I didn't warn you!!)
A lil' Airstream pot holder--custom colors!

1957 Tea Towel, to match our beloved '57 Overlander

Monday, November 18, 2013

Another rainy workday

Of course, the past two weekends that we didn't work on the trailer were sunny & mostly warm.  This Saturday?  Rainy & chilly of course!  Not too cold, but not warm enough to continue working on stripping the front end cap.  So, at least we had the Airstream to keep us dry.  We were able to finish sanding the exposed frame, grind down any burrs on the frame to get ready for welding, disinfected the walls inside the trailer, and removed the old step.  Today I ordered a new step, and some new window cranks, so hopefully they'll be here before next weekend--and of course, they're calling for rain!
My mom helping remove the old sealant

Our brother-in-law, Derek, cutting some new iron pieces for the frame

Mark sanding the bottom of the frame

Sunday, November 3, 2013

More fun with windows....

The windows that are able to be removed from their tracks (in other words, the ones with broken cranks), have now been resealed.  The ones that still have the crank attached are proving to be a bit of a pain.  We can't figure out how to get the crank off the track that runs down the middle of the window.  Because that crank is still attached, the glass can't slide out.  I'm about to just fix the seal with the window attached, which will probably be tricky, but not impossible.  It's frustrating because I'm sure the answer is simple...but I'm getting impatient & irritated....surely it's not rocket science!

Sunday, October 27, 2013

Window seal accomplished!

Brought the rear window home with me and ordered new window seals from Vintage Trailer Supply this week.  The new seals arrived yesterday, so as I sat by the fire recuperating from our Halloween party, I was able to remove the old dried up seal, cleaned up the window really good, and installed the new seal.  Fits perfectly!!  The folks at Vintage Trailer Supply were kind enough to help me figure out which one I needed. 
Here's the before and after:
I did it!


Sunday, October 20, 2013

Paint? Tar? Sealer? Who knows....

Yesterday's work was not-so-fun, not-so-productive.  The aircraft stripper that did so great in the aerosol can, did not fare so well being painted on.  Of course, buying it by the jug is much more cost effective than the cans, but I will be going back to the cans to try to tackle this end cap.  I do believe that I will step it up to a more hard core (read: dangerous) form of stripper for the top.  Thankfully (and I am thankful for the small things), the rear end cap is not painted with this goop so there's that.  Not to mention the fact that it was kind of rainy on Saturday, so maybe the dampness played a part in the ineffectiveness of the aircraft stripper this weekend.  Going back tomorrow with aerosol can in hand....we'll see!

Sunday, October 13, 2013

Dropping the belly pan & showing some grass....

My brother-in-law cut out the rusted pieces of the back frame this week.  We're working on getting new pieces cut and then welded back in.  Yesterday we dropped the front belly pan.  All the Airstream restoration experts always say it's not a project until you're standing on the ground inside the frame.  Well, I guess it's officially a project now :)
Currently pricing plywood for the floor, prodex for the insulation, and brake wiring.  I'm absolutely thrilled with this weekend's progress!
Rusty pieces of frame removed


Showing some grass

Standing on solid ground, yet inside the 'Stream.  We've come a long way, baby.

Monday, October 7, 2013

Can you say "rusted & busted?"

Derek helping out with the floor removal & inspection of the rusted frame.

Maybe we should change the name from Wig Wam to Rust Bucket?? :)
We are known for doing everything bass-ackwards, and this project is not exempt from that mentality.  While we had initially planned to start from the front of the trailer & move to the back, upon further contemplation, we've now decided to start in the back & move forward.  So....with that being said, we took out the back floor this weekend.  It came out in bits and pieces, and to be honest, most of it was removed by hand because it was so rotten.  Because of all the rotten wood, the frame has obviously been exposed to much water and dampness over the past 50 years and has succumbed to the rust.  The main frame is not too bad, although there are spots that need to be strengthened, the cross beams were shot.  The one in the very back (under the window) wasn't even connected to the frame anymore, as you will see from the pictures below.  Looks like we have some welding work ahead!!!

Monday, September 16, 2013

Oh deer....

No work on the 'stream this past weekend, as we had several local events that were going on that we wanted to attend.  However, I wanted to share with you the cutest little necklace that I bought on Etsy.  I plan to remove the chain and affix it to a wall or one of the wood partitions.  I have big plans for it!

Sunday, September 8, 2013

All interior skins are out!

We started this process of removing everything in the Airstream back in May.  As of Sat, Sept 7, we can officially say it is all removed.  Every item that was nailed down, riveted in, screwed in, glued in, and painted on is now gone.  Only working on Saturdays has been one of the reasons for taking so long, but then again, I'm pleased with what we've done and the time frame in which we accomplished it.  Could be worse, ya know?!  Now we begin the process of removing the floor and the belly pan.  We haven't exactly figured out which one we're going to tackle first....there are two schools of thought with this phase, and a lot of it will depend on how much my brother-in-law can assist us over the next few days.  We're going to be hitting some busy weekends over the next month, so there will be limited times of work days.  Either way, I hope to have the floor out and the frame painted before cold weather sets in.
Long ceiling panel making its way out the back window

Front end cap out--all interior skins removed!

Tuesday, September 3, 2013

It's like an oversized, upside down taco

Well, this past Saturday yielded only one thing.  The removal of the ceiling panel that runs almost the entire length of the Airstream.  We *finally* got that thing down.  It was nasty, it was not fun, but we got it done.  To get it out of the trailer, it needs to go out the back window.  While we did get the screen removed and the middle pieces of the frame down, we haven't quite tackled that job.  We decided to put it off until next weekend.  It was so hot & humid this past weekend that we couldn't handle it, and that big ol' upside down taco is gonna have to be rolled much tighter than what you see in the photos below:


Sunday, August 25, 2013

Big progess made...

This weekend's work yielded quite a bit of progress.  Probably one of our most successful work days yet!  We got the outside antenna removed, the rear end cap out, tried out a stripper for the exterior gunk that was applied, and tried out the stripper on the interior paint.  The stripper used was aircraft stripper purchased at Auto Zone.  It had been recommended by one of my airstream restoration friends (thanks Lauren!)  It worked wonders on the exterior....not so much for the zolatone paint used on the interior panels.  Maybe it will just take a few more applications....we'll see.  Hopefully next weekend we'll have all the interior skins down.  All that's left is the ceiling and the front end cap.
Highly recommended for exterior stripping!

Watch those scrubbing bubbles work :)

Made a great deal of difference after just one application...
Read end cap removed!!  Woo hoo!

So proud of our efforts today :)


Now you see it, now you don't...

Sunday, August 18, 2013

Behold! The frame!

Temperatures in the 70s in August.  In North Carolina? Unbelievable, but super nice not to sweat immediately upon entering the aluminum oven, aka, the Airstream.  We headed out to work on the trailer Friday afternoon since Mark was off work on Friday.  (Makes me a happy girl!)  We tried to address the door knob, only to discover that the plate we bought to cover the existing hole wasn't big enough to rivet onto the door.  (So, we gotta get a patch for that hole, just to cover that up with a pretty plate).  We removed more interior skins.  But the biggest news of the weekend was the picture I got from my brother-in-law Saturday afternoon......BEHOLD.  THE.  FRAME! 
When he texted me this picture....to say that I squealed like a little girl would be an understatement.  Such a blessing to have someone who was willing to help us with the floor, even though this isn't a project he necessarily wanted to undertake :)
Now time to order some POR-15, get to sanding, and start pricing marine grade plywood.  Oh, and we need some new steps too....
Thanks Derek!  We owe ya :)

Sunday, August 11, 2013

Something was bound to get broke....

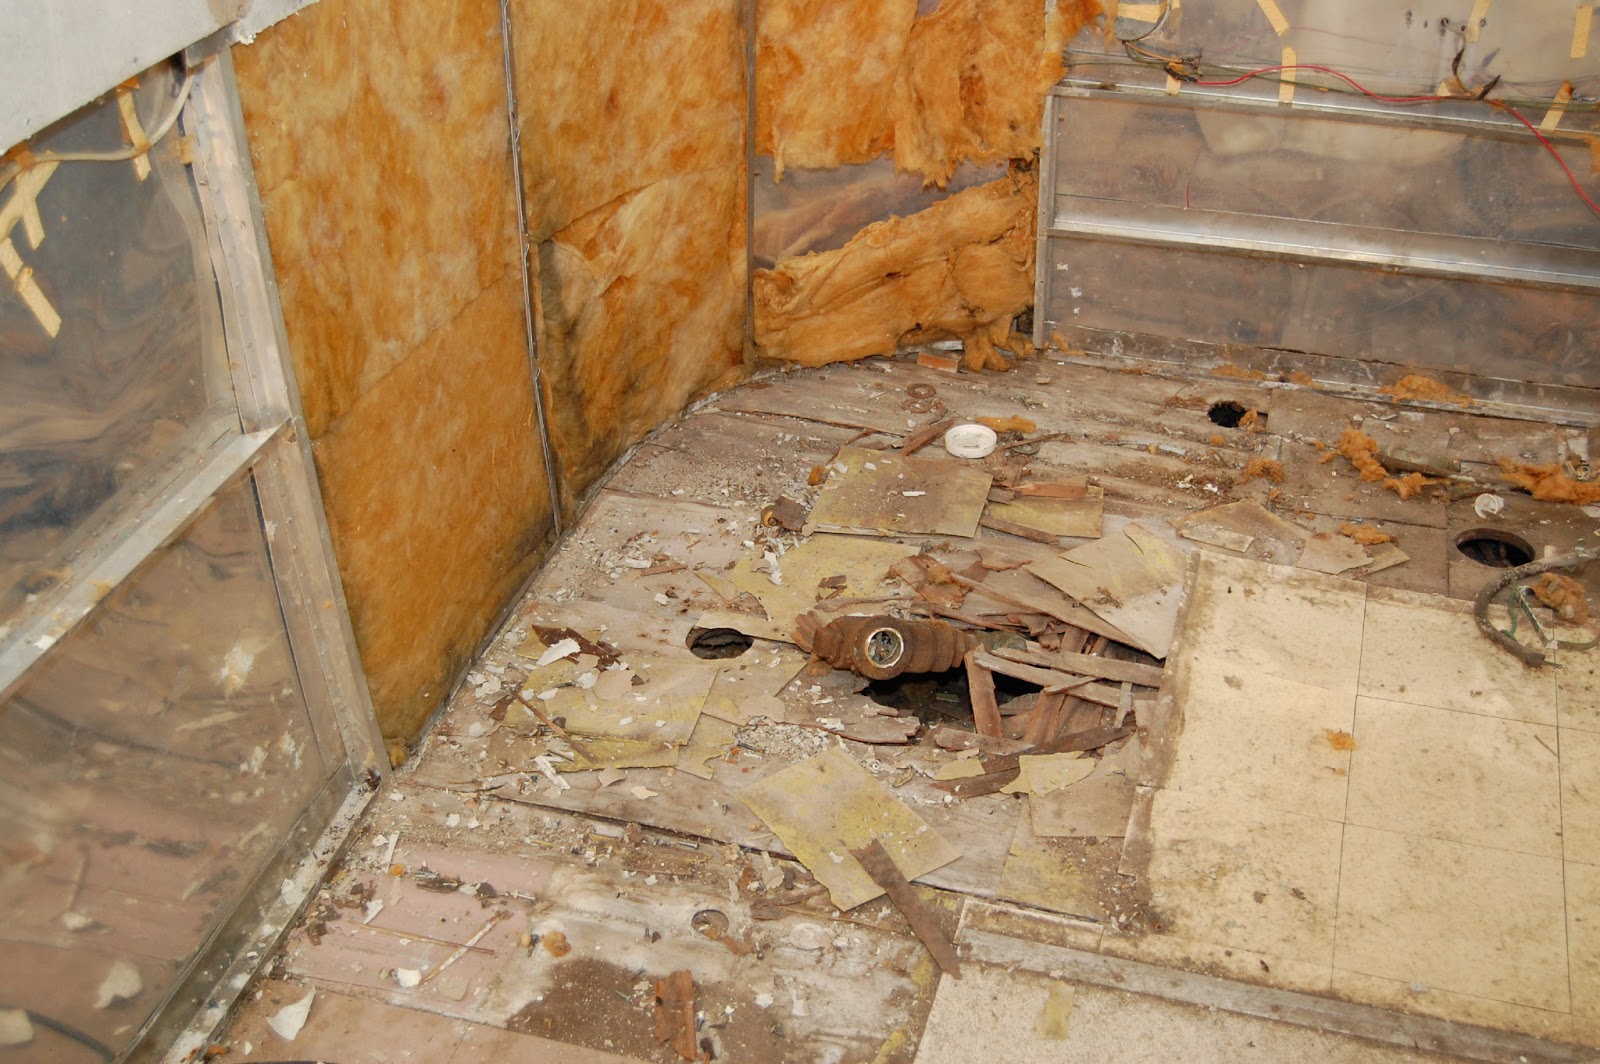
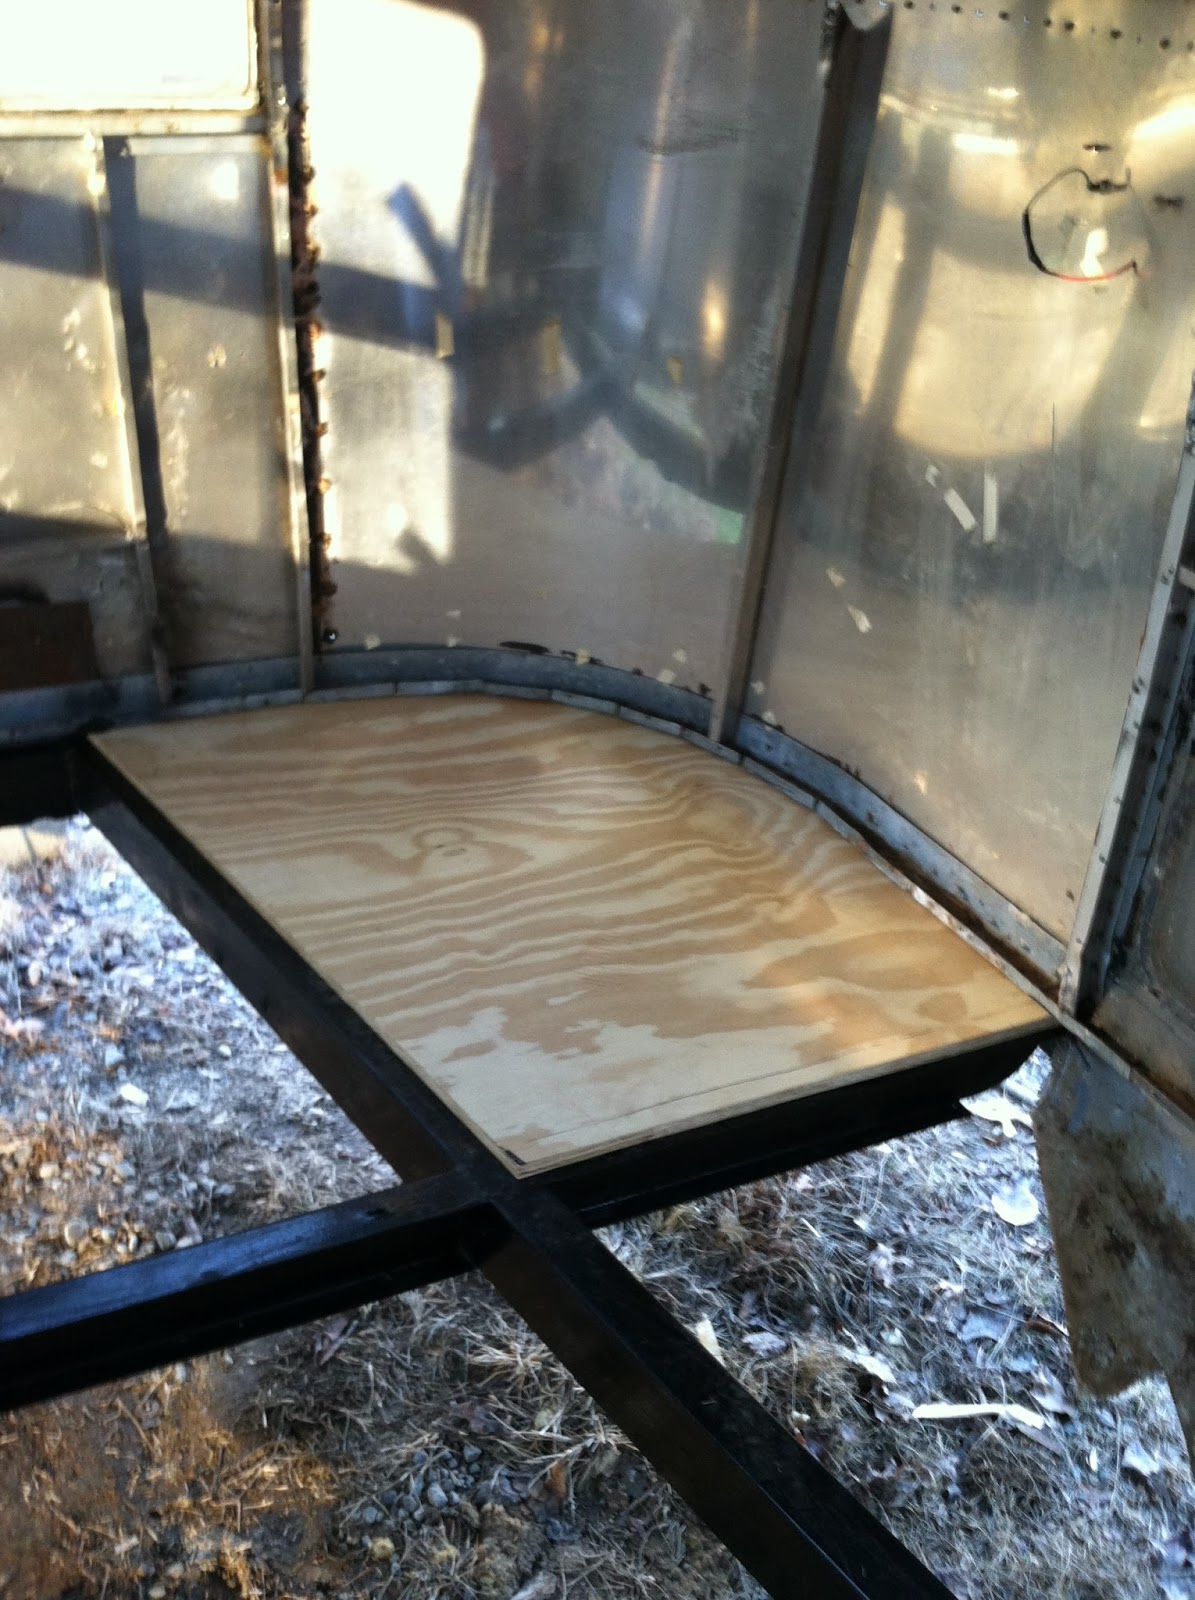
I'm honestly surprised it took us this long.  But we finally broke something.  My parents are kind enough to let us store the wig wam on their property, and when my Dad convinced twisted our arm enough to talk us into moving the Airstream into an open field (for lighting purposes!) we obliged.  Not happy about it, but oh well.  He's helping us remove the floor, and the barn had no electricity.  We were only lighting the area with work lights.  So, here we go, moving again.  Moving to a field that used to be the home of a greenhouse, so it *does* have running water and electricity nearby.  Sigh.  (Can you tell I'm not thrilled with this turn of events????)

Well, we move the Airstream and forgot to close on of the back windows.  It hit a low shelf in the barn and not only shattered but bent the frame.  *&^*%@!  I'm sure it's something that can be replaced, fixed, repaired, etc.  But, it didn't have to be this way.  On a different note....I found a handle for the lock!  Thanks to Vintage Campers, as they worked with me answering all my questions and nutty emails....helping me find the best possible fit for this poor door that only has a hole in it.  Fully operational with a steak knife and/or pocket knife!!!  Hopefully we'll get the handle installed this week.  Until then, check out our broke window!
Bent out of shape....

No glass, no class.

From one abandoned field to another...

Previous key hole....in the literal sense

Hitching a ride on a 'Stream full of dreams...

Friday, August 2, 2013

Axle has arrived!

Our axle was delivered last week.  And while I sit here at the beach, on vacation, I can't help but be a little sad that I'm so far away from the wig wam and that it's been two weeks since we worked on it.  But, next weekend we'll be back at it!  'Til then, here's some pictures of the newest acquisition:
Shiny & new!


Sunday, July 21, 2013

The floor removal begins....

Disclaimer--I have *no clue* how long this process will take.  This may very well entitle the next six months of progress, who knows??  I didn't get a chance to update the blog last week, but we did make it over to the 'Stream and take a load of unusable items to the landfill.  Scraps of wood, insulation, old pipes, mattresses, cushions, etc.  It was something that desperately needed to be done, as our pile of removed items is creating a snake den in the barn.
This week brought an opportunity to finally get the shower pan removed, one of the upper storage cabinets down, and the biggest feat: beginning the floor removal.  We removed the screws from the C-channel in the front part of the trailer.  Our hope is to remove that section first, therefore keeping the shell stable.  We are not trying to do a shell-off restore, we'll see how far this goes.  My dad helped us out with sawing up the first portion of the floor.  We were able to lay eyes on a small portion of the frame, it doesn't look too shabby, but could use some TLC.  A pretty bad storm came up while we started, so we had to cut it short.  Will be on vacation for a week, so we'll be back in full gear in a couple of weekends.
Shower GONE!!!!  *finally*

Upper storage cabinets removed

Getting my dad involved in the mayhem

Tuesday, July 9, 2013

Fun & frivolity

The biggest news lately is that we received our title in the mail a couple of weeks ago.  So, it's o-fficial.  We are the owners as proclaimed by the fine state of North Carolina!

As promised, during the slow renovation times, I will be posting some items that I pick up here & there for the 'stream.  Recently, I purchased the sweetest little tea towel from Etsy (more specifically, follow the link here for the shop: lemonade makin' mama).  The teal mason jar is gonna look just fab in our little kitchen.


Also, I recently purchased the neatest app for Instagram (Rhonna Farrer designs) and was able to design this lovely little photo of the wig wam.  Check her out!!  Snug as a bug in a rug in the barn!

Looks like the next time we'll be working on the trailer will be July 20th.  We shall catch up soon!

Monday, July 1, 2013

If these walls could talk (or buzz)

This weekend's interesting find upon removing the remaining lower walls was a huuuuuuge wasp's nest.  Thankfully it had been vacated, but geez louise, that was a bit scary when the insulation was removed and you see THAT staring you in the face.

We were able to remove all the lowers skins except *one* little piece that was in the corner of the bathroom.  The shower base is still connected to the pipe under the trailer, and we don't have a pipe cutter, nor tin snips, nor a saws-all.  So, it remains.  As does that one piece of wall.  Needless to say, we were happy with our progress.  We won't be able to work on the 'stream for two weeks (bah!) but our next step will be removing the screws in the C-channel and removing the floor.  *fingers crossed*
wasps! well, they used to be there.


That *&^@# pesky shower floor.  And the one piece remains.

Monday, June 24, 2013

Rivet, rivet....

My new bestie

And so begins the process of removing the interior skins.  A bazillion rivets (probably not that much of an exaggeration) must be drilled and removed in some form or fashion.  Even when you drill through them, sometimes they still hang on and must be chiseled off.  All the while trying to save the skins for later use.  We broke a drill bit 15 minutes into it, but managed to not break another.  Somehow the window next to the door got cracked too.  Not sure if it cracked when I tried to open it to catch a breeze, or if by drilling one of the rivets the vibrations caused it.  I'm just not sure...but we'll need to replace it in the future.  We managed to work our way from the door all the way around to just over the wheel well, so pretty much half done.


First panel!  Here we go....


Busted....